
Across the Miles
Hello all, Donna here with another post for Dies R Us. I came across these Torrance Trees die from Memory Box and I have found that I use them in more ways than I thought. Here's my post for the Dies R Us blog.

Using layers of Distress Oxide inks, I sponged on the colors drying in between. I then cut a small strip in the shape of rolling hills or a knoll, and used several layers of Bundled Sage. After assembling the card, I decided to use some of the negative pieces from the trees to add more interest. And finally I wrapped the top layer in twine and added a bow. I hope this inspires you!
______________________________________
Thinking of You
June 10, 2018


Heart Soul
June 12, 2018


_____________________________________
Peaceful Scene for DiesRUs
MAY 22, 2018


April 19, 2018
Hello all, Donna here with another post for Dies R Us. I came across these Torrance Trees die from Memory Box and I have found that I use them in more ways than I thought. Here's my post for the Dies R Us blog.

Using layers of Distress Oxide inks, I sponged on the colors drying in between. I then cut a small strip in the shape of rolling hills or a knoll, and used several layers of Bundled Sage. After assembling the card, I decided to use some of the negative pieces from the trees to add more interest. And finally I wrapped the top layer in twine and added a bow. I hope this inspires you!
______________________________________
Thinking of You
June 10, 2018
Donna here for the DRU blog post this month. I have an unusual folded card for you using some DRU dies from Impression Obsession.

To begin, you need a piece of card stock 5-1/2 x 8-1/2 and scored on the long side at 4-1/4, 4-3/4, 7-1/4 and 7-3/4. You will also need two pieces of designer papers at 5-1/4 x 1-1/4 and 5-1/4 x 2-1/4. (The picture below shows two scalloped circles which I discarded and opted to used the Evergreen Trees as seen in final project).

Fold on all score lines and affix the narrow designer paper to the top front and the larger designer piece to the back (this will eventually be folded around to the front). Fold on all score lines and apply tape close to the fold on the 1/2” section and adhere as shown in photo below.


I then die cut several evergreen trees pop dotting some and adhering others flat. Next I die cut the deer trio from kraft card stock and added some details to make them more visible. and placed them strategically on the card. Lastly, I added a sentiment and cut it into a banner shape and attached it.
Thanks for taking the time to read this and I hope I’ve been able to inspire you in some way.
______________________________________________________
Heart Soul
June 12, 2018
For this card I cut:
- Pink base piececard stock at 5-1/2x8-1/2 a- Top
- White layer is 3-3/4 x 5-1/2 and die cut using the Fancy Cutout Border.
I then die cut the Circle Shaker Frame and used only the two outer layers. I sponged the inner layer with Distress Oxide Black Soot ink and the outer layer with Distress Oxide Mermaid Lagoon and embossed the Mermaid Lagoon piece only.
I stamped this little mouse image and colored it in. The Circle Shaker Frame was then mounted over the mouse image which I hand cut to fit behind the frame.
Finally, adhere the white layer to the pink card base. Place your mouse layers on the front of the card using 3-D foam squares. I also added some glossy accents to the heart and Black Nuvo Crystal drops to mouse eyes for more dimensionn. Stamp your sentiment and fussy cut it out then layer it on the same pink card stock and fussy cut that as well. The final touch is a one inch bow on the mouse head.
I hope this inspires you to use some of the fantastic dies on the Dies R Us website as well as their consumables.
_____________________________________
Peaceful Scene for DiesRUs
MAY 22, 2018
Hello! This is Donna once again for Dies R Us and today I have a very serene scenic card for you. For this card I used the WinterSports die by Find It Trading. Many dies by Find It Trading are geared for the gentleman in your life. However, this die in particular, can also lend itself to a sympathy card, birthday or thinking of you, etc.

You will need your base card stock measuring 5-1/2 x 8-1/2, folded in half for an A2 card. One white piece at 4 x 5-1/4 and your die cuts.

To begin, place a 1” mask where you would like the moon to be. Place your mountains where you’d like them to be and draw a light pencil line underneath and remove mountains for later. Sponge your evening sky colors using Squeezed Lemonade first followed by Orange Marmalade and blend your inks. Remove the mask.

Next create your blended water using Broken China, Salty Ocean and Blueprint Sketch. Create movement in the water by using a white gel pen.


Affix your dies, and adhere to card front. Note: I changed to a white card base at the last minute to better showcase the colors of the scene. I also put in a few birds using a micron pen to add more interest.
----------------------------------------------------
JUST A NOTE for DIES R USApril 19, 2018
Hello all you ‘die’ hard crafters! This is Donna and I’m so excited to be a part of the Dies R Us team. I thought I’d share a CAS (Clean and Simple) card with you today using some very basic tools. You can view all the products I used by following this link to the Dies R Us blog.
JUST A NOTE
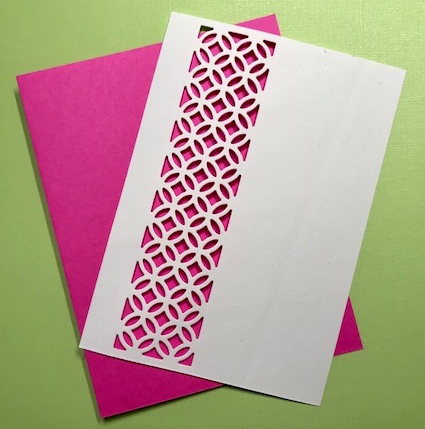
Here are the items I used for this card. In depth explanation follows.

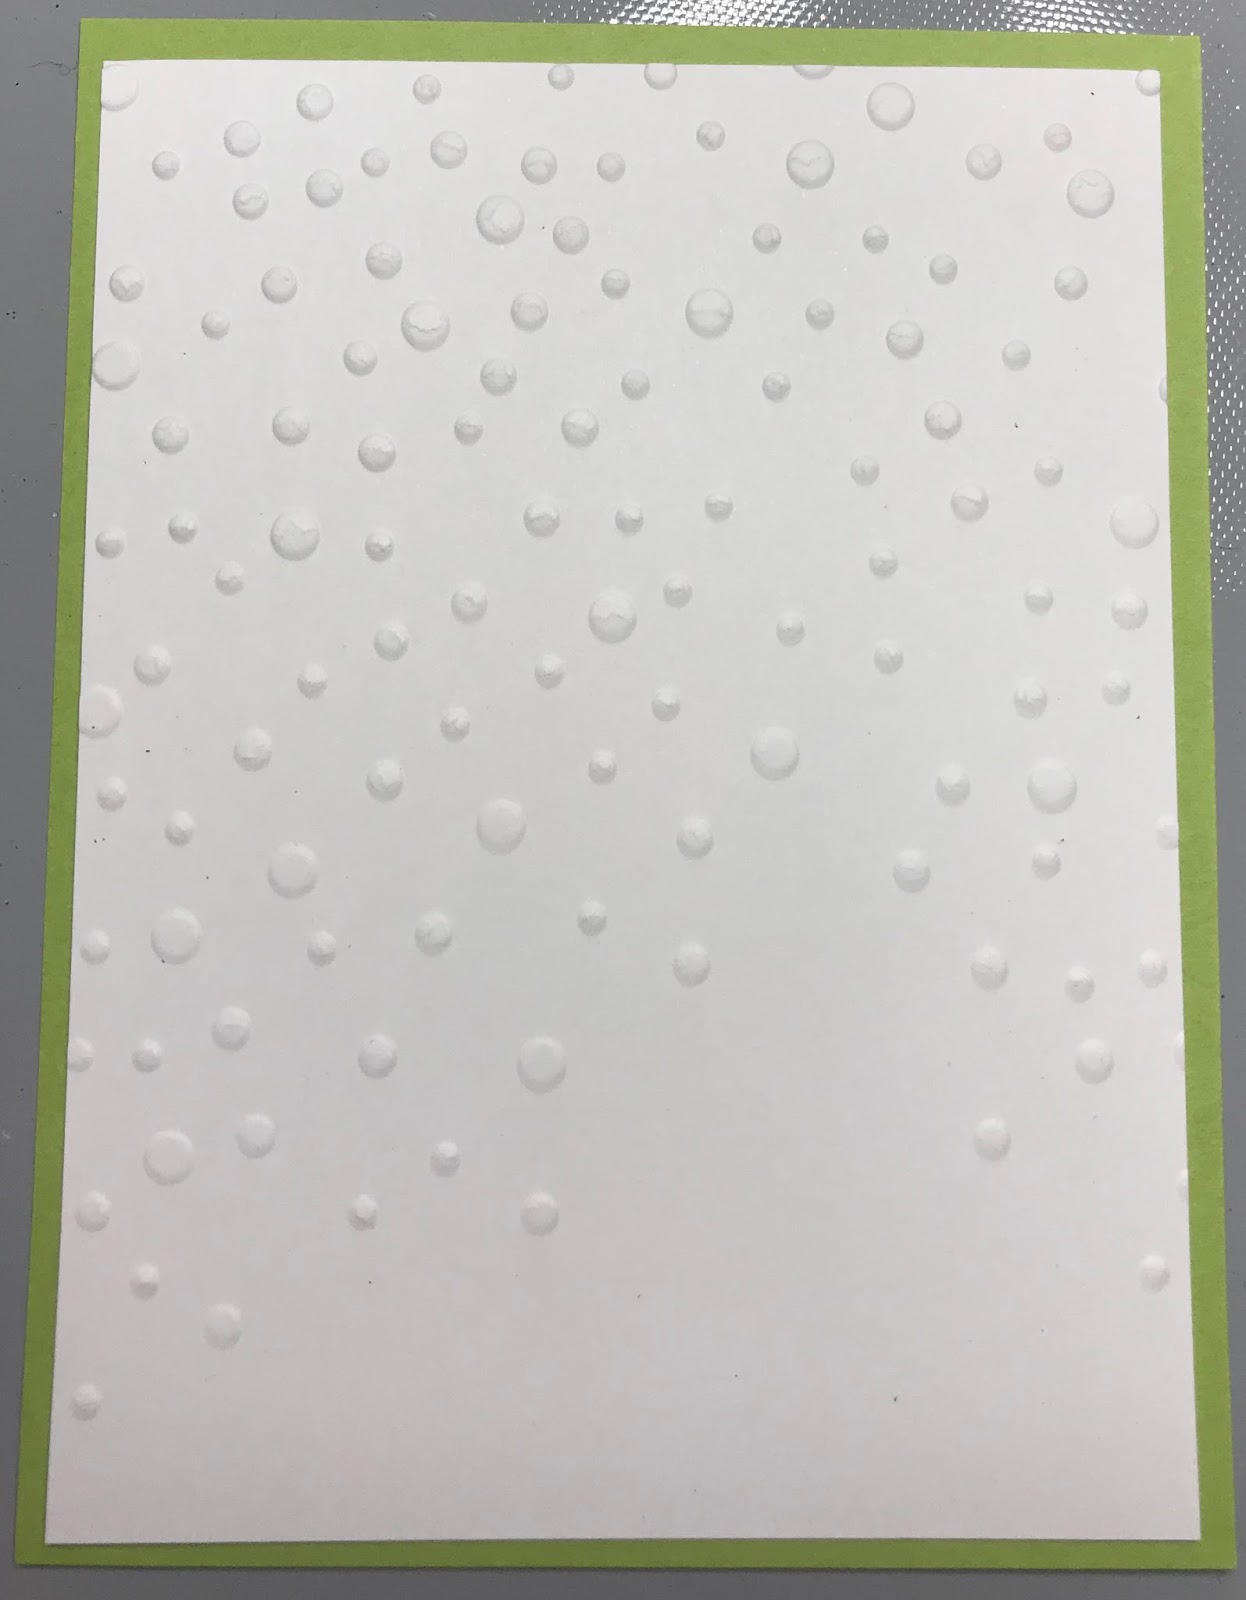
To begin, you will need a white base card stock piece measuring 5-1/2 x 8-1/2 and folded in half to make an A2 size card. Next you will need a piece of green card stock cut at 4 x 5-1/4 and another white piece cut at 3-3/4 x 5.

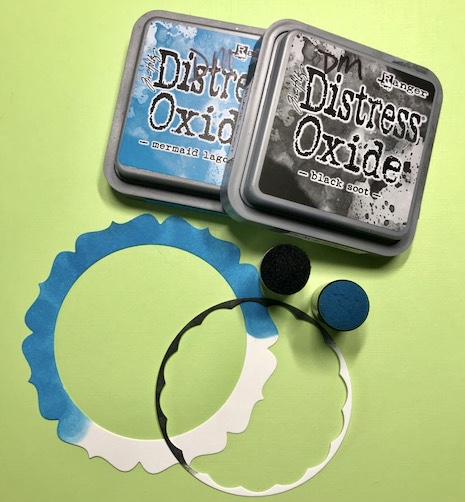
Die cut the Small Antilles Left hand corner die in two colors: one in green and the other blue.

Carefully snip the heads off the flowers from the blue die cut piece. Match up the flower heads onto the green Antilles die cut and glue in place. (Note: I also went in afterwards and cut the teeny little buds as well - see final project below)
Run the small white piece through your embossing folder. Using your Ken Oliver Stick It sheets, adhere your flower to the lower left corner of your embossed piece and your sentiment where desired on card.

If desired, you can add some Clear Wink of Stella to your flowers. Adhere all your layers for your final project.
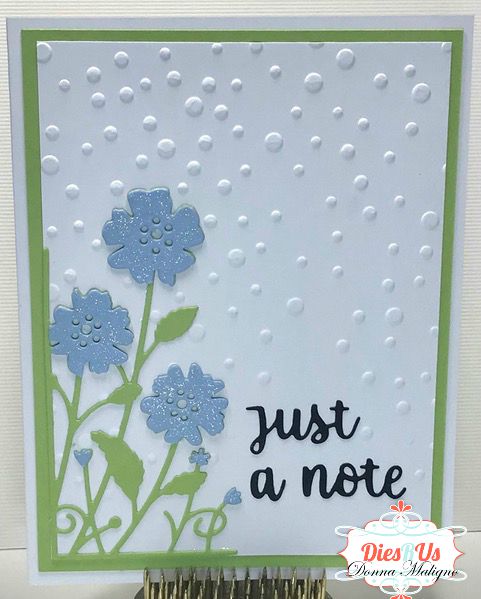
So hop on over to the Dies R Us blog to see the list of products used that you can easily purchase through Dies R Us.!