Followers

Looking for the monthly challenge? Click on the tab below.

Monday, December 29, 2014

Last post for 2014!!


Oh. My. Goodness!!  Where did 2014 go?  One minute it was January and the next it was December.  Craft-Dee BowZ had such a wonderful 2014 and we can only look forward to an even better 2015.  With that being said, I'd like to show you what I put together to end this wonderful year.

I continue with my obsession with Impression Obsession dies with this project.  I created a "picture frame" out of white card stock.  I then distressed the a separate piece of card stock for the inner portion using Salty Ocean and Sapphire Distress inks for the sky.  The snow was created by simply hand cutting wavy lines and pop dotting them to the bottom of the blue sky.  I added a bit of glitter to the snow 'cause I'm such a sparkly girl (hard to see in this picture).


Next I die cut two sets of trees by IO and I crimped the big pine tress and left the smaller pine trees as is.  These were glittered and put into place.  Before placing the trees and deer, I used peel-offs along the edges of the "frame".  I chose two of the deer to place in and on the frame, mounted the entire "picture frame" on blue card stock and added a bright, sparkly bow to showcase the entire card.  Below you can see the "diorama" effect of this technique.


Thank you from the bottom of my heart to all of you who have been supportive in following the Craft-Dee BowZ team all through 2014.  We couldn't have done it without you!  Happy New Year!

Donna


Sunday, December 28, 2014

Many Thanks

Hello today I am sharing 2 projects I made for my last post on the Craft-dee Bowz team.  I have enjoyed working with everyone and the new team is going to be beyond amazing.   My 1st project is a bow card I made using my CDB tool nothing makes ribbon creating any easier. 


Many Thanks to everyone at Craft-dee Bowz for an amazing year
Now on to my 2nd project which is actually a home decor piece
 I will be hanging this in kitchen
 I thought Memories was perfect for this post for the memories I have from CDB
 I added my bow underneath some of the flower it adds a perfect finish to the whole thing

I hope everyone had an amazing Christmas although mine was not the happiest, but I am hoping next year is better and for certain things that has happened to turn out for the best.  Always remember your loved ones and never lose touch you never know when things can change and remember everyday is a Gift! not just Christmas...

simply Monica

Tuesday, December 16, 2014

JOY

Hello everyone,
Barbara here back back today with what is my last Craft-Dee BowZ post here for 2014.We have a few more posts left to finish out the year and then we will have two new designers starting in January. Make sure to check out our blog for the last of this years posts.

I recently bought a stair step die from Accucut and decided to use that card design for this, my last Craft-Dee BowZ project for this year.

Let me share this card with you.


I used a typewritten designer paper to mat the front while I used an embossed white card stock to mat the back.

 
 On the steps I used a cut out of the word JOY using that same designer paper


Here is a close-up of my bow. I made a triple loop bow and positioned it up by the top step, allowing for the card to be closed and mailed.

SUPPLIES USED ON MY PROJECT
Stamps:  Sizzix Holiday Joy 
Paper/Card Stock
: Green CS, Wjite CS, DP
Ink: Memento - Olive Grove, Peanut Brittle, Rich Cocoa
Dies Used: Sizzix - Holiday Joy, Word Play Alphabet, Accucut - Stair Step Die
Accessories
Craft-Dee BowZ  tool,  ribbon, embossing folder, dimensional foam, Starform Stickers (used as border on the front panel over the DP)

Friday, December 12, 2014

Present Card with Guest Designer Dana Tatar


Hi Craft-Dee BowZ fans! Guest Designer Dana Tatar here today sharing a festive holiday card. I thought it would be fun to make a card that looked like a wrapped present and this is what I came up with.


I attached a fun piece of red polka dot patterned paper to a cardstock card base and then applied green polka dot fabric tape both vertically and horizontally across the center of the card. I added a large canvas flower to the center of the card and tucked gold Starform Stickers around the flower. I backed the gold holly leaves with green paper for a pop of color. I added a stamped gift tag under the edge of the flower. I topped the flower with a large glittery triple-loop bow that I tied with my Craft-Dee BowZ Tool. I finished the card with a patterned paper tag, small flower, twine bow and some acorns.

Thanks for stopping by today!

Supplies: Patterned Paper: My Mind's Eye, Nikki Sivils; Tag: Avery; Gold Stickers: Starform; Ink: Ranger; Stamps: Paper Wings Productions; Canvas Flower: Canvas Corp; Other: Ribbon, Twine, Small Green Flower, Fabric Tape, Cardstock

Tuesday, December 9, 2014

"Ornamental" Red and Gold Card

Vicki here with my December inspiration for you!

I'm a traditional kind of gal when it comes to the Christmas holidays.  I love the deep, rich reds and greens along with the ever present gold and silver that accompany them during the season.  Here at Craft-Dee BowZ, we are working with these colors during the month of December following a Christmas/holiday theme for our projects.

I created a card using red and white with gold accents.   The fabulous ribbon in our DT package this month was perfect to adorn the top of this Christmas ornament!

"Merry Christmas"

The card base is deep red cardstock matted with white pearl, embossed paper.  I used a folder that reminded me of falling snow as the background.  The ornament is a two part die-cut, the base and the over layer.   I added a gold jump ring at the top of the ornament along with a red/gold bow created with my amazing Craft-Dee BowZ tool.  Making bows is an easy task when using this tool. The sentiment sticker was another fun treat that came with our DT product.  It's matted with both white and gold paper cut with one of my favorite tag die-cuts.  I used pop dots on the back of the ornament and sentiment tag for added dimension.

Featured Product
Craft-Dee BowZ Bow Making Tool

Thanks for stopping by to share my holiday inspiration!

Be sure to play along with our December monthly challenge...
"Anything goes and include a bow".
You could be the winner of 25 yards of yummy ribbon.

Sunday, December 7, 2014

The Stair Step Bow

Hi Everyone,
Thanks for stopping back today. I posted this on my blog but thought I'd share this over here on the Craft-Dee BowZ blog as well. This post will show you how I achieved a triple loop look while only making a double loop bow. Maybe I should call this look the stairstep loop bow, because the loops look like they are in a stairstep position, one on top of the other.


Well you think you are seeing 3 loops but its a trick. Let me say this will only work with wired ribbon, because you are manipulating the ribbon and the wire holds the ribbon right where you have positioned it.

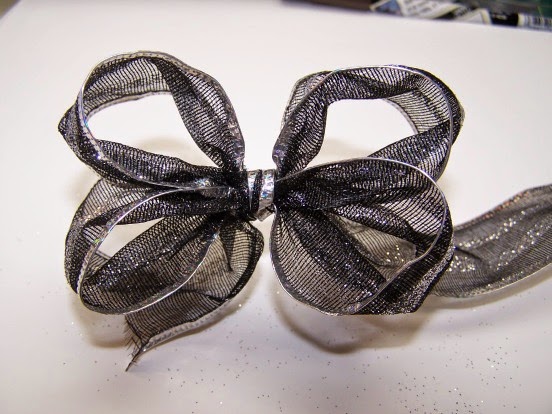
 I am using a black and silver wired edge ribbon and it's 1 1/2" wide

First, I started out making a double loop bow, like usual. And of course I am using my Craft-Dee BowZ tool.

This is the 1st wrap of ribbon around the pegs.

This is after the 2nd wrap of ribbon.

I have tied the ribbon ends and this forms the knot of the bow.

I've removed the ribbon from the tool  and I have pulled the loops out and now you can see there are 2 loops on either side of the knot.

 Fluff them out somewhat


Now I have positioned the loops one on top of the other. At this moment the loops are the same length and they are stacked.(A double loop bow has 2 loops on either side of the knot)

 Top view, - from the top it just appears to look like an ordinary single loop bow because the loops are actually stacked one on top of the other.

 Here is where the trickery begins.
The top loop is the loop that gets manipulated. See how I have started to dent it in to the center of the loop, down towards the knot, somewhat. Think of it as you are making a pleat. I started that dent about 1/3 of the way up from the knot. If you do the dent in the center of the loop then you will have these two loops being the same size and you won't achieve a stairstep effect.


Make the dent to both of the top loops.

 See how I have brought the ribbon from the top loop in more toward the knot. This defines the fake top loop even more.


 Here is a different view.


 Here is a view from the top after working with both top loops.


 Here is a side view. See how that top loop looks kind of swirly. The top loop is just bent in, in a pleat fashion, to give the illusion of another loop. 
That's all there is to this bow. Its a great bow especially if you don't have enough ribbon to make an actual triple loop bow. I like this effect because of the stairstep look.

 I hope the pics help you to see how I designed this bow. This bow does fool the eye, doesn't it.

Thanks for stopping back today. Now it's your turn to make a double loop bow with a stairstep effect.And wouldn't  that bow would look great on a gift.

Have a "bow"tiful day

Saturday, December 6, 2014

December Blog Hop Winner

Hi Everyone,
Welcome back!!!  

Time to announce the winner of the December  Blog Hop here at Craft-Dee BowZ.

Thanks to everyone who visited and commented on the posts throughout the blog hop. We are so glad to be able to give you some inspiration, ideas, tips, etc for Christmas. We hope you found the cards and projects really creative!! Hope you were able to gleen some ideas from the design team.

 Next, I want to thank our talented design team on their fabulous and ever so creative projects.
They always do a fabulous job. We are very lucky to have them here on the Craft-Dee BowZ team.

Our next blog hop is scheduled for February 5 @ 10:00 p.m. et and the theme will be Valentine

So mark your calendars and save that date and plan on joining us for our first blog hop for 2015


OK, OK!!!! Let me announce who the winner is:

2amscrapper

Congratulations  on being our winner


Please contact Barbara at the email below by December 13 (one week) to claim your prize. 
bbruder@fuse.net


Thanks so much for hopping with us and we look forward to seeing you again
 at our next hop scheduled February 5.

Just a reminder, stop back for our weekly posts (each Tuesday) hosted by our super talented design team members.   Vicki will be posting on Tuesday. Please stop in to see her project and Sunday Barbara will be posting a picture tutorial on how to make the bow she used on her card in the blog hop.

See you soon.

Wednesday, December 3, 2014

Craft-Dee BowZ Christmas Holiday Blog Hop

Welcome to the Craft-Dee BowZ Christmas Holiday Blog Hop.

Oh, Christmas is such a special time of year. The colors, the images, the gifts, and.........well everything about Christmas is special. It's fun decorating and just getting everything ready for that special day.

The elves (also known as the design team members) have been hard at work getting projects ready to inspire you. So if you are still looking for that perfect thing, you know, a card, or some decoration, check out what we have to share with you.

Craft-Dee BowZ has a small design team so it won't take you long to visit all the team members and leave comments. Leaving comments on the blogs of all the team members will make you eligible to win your very own Craft-Dee BowZ tool. The winner will be announced on Sat. Dec. 6. To claim your prize you must contact us by email (bbruder@fuse.net) by Saturday Dec. 13. That will give you a week to claim your prize.


Sit down for a quick breather and enjoy our blog hop.

Today we are going to start off  with a gorgeous creation from Donna, the owner of Craft-Dee BowZ.

Here is what Donna has to say about her very creative card.

The Birch Tree Scene

Hello bow makers!  This is your first stop for the blog hop and I have a card that shows my (other) obsession with Impression Obsession dies.  Don't forget to leave a comment to have your name in the drawing for a Craft-Dee BowZ tool for completing the blog hop.  You MUST have entered a comment with each designer to qualify.

I fell in love with Impression Obsession dies last year and my heart did a special flutter when I saw the new birch trees and cardinals.  This card can be used for  many different occasions both for male or female.  I adhered the birch trees and cardinals on blue card stock first.  I then cut an oval out of white card stock using my Spellbinders oval die and imposed a fancy die over the opening.  I then attached the birch trees in back of the white opening.  The addition of a perky checkered bow made on my Craft-Dee BowZ tool and some pine trees by Impression Obsession completed the look.  This was all mounted on a red card base.


Thank you one and all for your support and for playing along in 2014 with our Challenges and Blog Hops.  And good luck to one lucky winner!


Next you will want to hop over to Dana's blog to see what she has created just for you. 

Here is the list of the designers in case you get lost. 

Donna (Here on this blog)


From all the designers here at Craft-Dee BowZ, thanks for stopping by.
We all want to wish you a Merry Christmas, Happy Hanukkah, Happy Kwanzaa and a Happy New Year.

Have fun everyone and don't forget to leave comments.


Tuesday, December 2, 2014

Merry Christmas

Hi Everyone,

Well, today is the 1st Tuesday of the month and that means it's my turn to post here at Craft-Dee BowZ. This month's theme is Christmas/Holidays.

Here is the card I made for this month's theme.

My Santa stamp is so old, but he's my favorite Santa stamp ever. I added stickers for the ornaments, the sentiment and the pine bough. For the background panel I used a sheet of designer paper that depicts images of Santa. Each of those images are about the size of a postage stamp. I used vellum to tone that paper down since I wanted my stamped Santa to be the focal point.

I glittered the ornaments and colored the pine bough with an alcohol marker.

The bow is a multi loop green sheer organza ribbon. I love working with that type of ribbon.

Here is a close up of the bow.


Reminder - We would love it if you could set aside a few minutes to join us in our blog hop. The hop starts tomorrow nite at 10:00 p.m. ET and ends Saturday at noon.Some wonderful Christmas cards are ready to inspire you and don't forget the awesome bows too..

During the blog hop, leaving a comment at the Craft-Dee BowZ blog and on the design team members individual posts will make you eligible to win the prize of the Craft-Dee BowZ tool.

Hope to see you at the hop.


Monday, December 1, 2014

November Giveaway - Winner

Welcome back everyone.

During the month of November we ran a contest centered around the Diemond Dies posts. Commenter's were eligible to win the die set pictured below.

Everyone leaving a comment on the Diemond Die posts throughout the month became eligible for the drawing.
We had a fabulous number of commenters. Thank you all for leaving comments!!

I put each name on a slip of paper and drew one slip

And the winner is 

SAMMI

Congratulations, Sammi!!!

Sammi, please email me (Barbara) at bbruder@fuse.net

You have til 12-08-14 to claim your prize. If not claimed I will draw again at midnight on 12-09-14

Thank you to all who participated in our giveaway. 

Just a reminder - We have a blog hop that starts at 10:00 p.m. ET on Wed. Dec. 3 and there will be a prize given away. The prize is a Craft-Dee BowZ tool. Leave comments here on the Craft-Dee BowZ blog hop post and the designers posts to be eligible. 

Hope you can stop back for our Christmas/Holiday themed blog hop.
 It is packed with lots of great inspiration.

I am looking forward to seeing you on Wednesday.


December Challenge

Hi Everyone,

Welcome to the December Challenge
 here at Craft-Dee BowZ, 

Thank you to everyone who participated in our November Challenge!!! 

  The submissions were fabulous and I love to see the incredible creativity that you talented people submit -- they are so amazing.  I think everyone is a winner; however, I could only choose a Top 3, an Honorable Mention and the Winner for the month.  Let me tell you, this task is daunting each month with all the talent out there.  
(Yes, I know I say this each month, but it’s true!)

Just to let you all know that the Winner, the Top 3 and any Honorable Mentions are all chosen on their merits, so make sure to get your creative juices flowing and send in your best submissions.


Who won the Grand Prize for the November Challenge??  
Well, without further ado the winner is:
BethieJ (Submission # 109)
Congratulations to BethieJ
You will have until December 8 (that's 1 week) 

to claim your prize

Monthly Prize
One Reel (25 yards) of Ribbon

To arrange for your prize to be sent and to receive a winners badge to display on your blog  please email me at bbruder@fuse.net by December 8th
Please put Craft-Dee BowZ Challenge Winner in the subject of your email.

TOP 3 WINNERS
(in no particular order)
1. Mervi (Submission #55)
2.Kitten Kraftz (Submission #76)
3. Cec(Submission  #116)
Please grab the "top 3 badge" on the sidebar here and 
post it on your blog .

We'd love it if you'd link back to our site here.

This month we have 
an 
HONORABLE MENTION 
going to none other than:

Kellie (aged 10) (Submission #60)
You will always be able to access the current challenge or 
view prior challenges by clicking on the Monthly 
Challenge tab at the top of the page.


The December Challenge Theme:

Anything Goes and include a HANDMADE BOW

This months code to use is CDB20


Here is some inspiration for you for our 

December Challenge

Vicki Robertson


Monica Edwards


Barbara Bruder


Donna Maligno 


The link to the guidelines for playing are on the top tab.

If you have any questions please email me at bbruder@fuse.net
We are looking forward to seeing your creation here.
Don't forget, the prize is one spool (25 yards) of ribbon
The December challenge closes on December 31 at 8:00 p.m. EST

PLEASE READ:


Effective immediately, due to the rising costs of mailing  prizes outside of the US, CDB can no longer bear that cost.   In order to give our overseas submitters the opportunity to be considered to be in the running for our prizes, we are offering the option for you to pay the shipping. 


Therefore, if you are a non-US submitter and are willing to pay the shipping costs if you are the grand prize winner, please place a dollar sign ($) after your submission name.

Thank you for understanding.

Saturday, November 29, 2014

Poinsettia, pine branches and glitter!

Hello bow makers and hello Diemond Dies followers!  This is the very last post using these fantastic dies.  It's been a wonderful, crazy, busy month with the design team and all you wonderful people following this event.  Today is the last day for showing these dies and we will be picking a random winner (drum roll, please) tomorrow!!  So be sure and check back here to see if your name is up in lights!

Well, on to my project.  This was a very tough project to photo and I'm afraid it still doesn't convey the correct color and sharpness.  Since I love glitter, this was so much fun to create.


Here's how I created it:
1.  I used a 5x7 canvass board for my project and using a large dauber,  applied Distress Tumbled Glass ink.  Just an FYI - I did have to heat set it  a bit for the next step.

2.  Since I didn't have a snowflake stencil, I simply punched tiny snowflakes in a random pattern from card stock.  I then placed it over the dried ink and using Dreamweaver paste, placed the snowflakes wherever I felt they were needed.  Immediately dust with glitter and put aside to dry (this is the hard part -- waiting, waiting…)

3.  Next I die cut the Diemond Dies Pine branch a few times and glittered them up to a fare thee well.   Gotta have glitter!

4.  I created this gorgeous poinsettia by first adhering white card stock to wide double sided tape.  Once it was die cut, I dusted all the pieces with glitter, rounded the petals and layered them to form the flower.


5.  I created a multiple loop bow with an extra tail (see how-to in our Video section) and adhered the poinsettia in the center.  Hmm, something was missing.  Aha!  It needed snowflakes on the ribbon tails!  Grabbed my homemade snowflake stencil again and using the Dreamweaver paste and glitter, I fixed that little problem. I love how it added more dimension and made it more cohesive!  But that meant more waiting, waiting till the paste dried (fingers drumming on table).

6.  Adhere long tail of the bow around canvass and attach in back sliding your bow to wherever  you want it placed.  Tuck the pine branches under the bow.

7. The border was created with a Martha Stewart punch and adhered  around the perimeter of the canvass on the back side.

8.   I then created my sentiment on my computer since all my holiday sentiments were either too large or too small, etc.  I created a banner out of it and using a glue pen, added glitter by just tracing over the letters.    I then glittered the edges of the banner sentiment and pop dotted it on to the canvass.

Well, I sincerely hope you enjoyed this fun month with our sponsorship Diemond Dies.  Don't' forget to leave a comment -- the more you enter, the more opportunities you have for winning the giveaway!

I will close by reminding you that next month is BLOG HOP month here at Craft-Dee BowZ and the design team has been very busy creating more inspiration for you.  Blog Hop dates are December 3rd at 10pm through December 5th at midnite.  We'll have a giveaway!!!  See you at the hop!

Donna


Tuesday, November 25, 2014

Craft-dee Bowz & Diemond Dies

Hi everyone Monica here sharing a special Craft-dee Bowz project partnered up with Diemond Dies.  Diemond Dies was so gracious in sending some of their amazing dies to our design team

Diemond Dies Natures Flourish Die

Diemond Dies Fall Leaves Die Set
I molded the leaves to actually make the flower shown above.  It is so versatile.  I hope everyone enjoyed my post and thanks so much for stopping by!!