Followers

Looking for the monthly challenge? Click on the tab below.

Sunday, December 28, 2014

Many Thanks

Hello today I am sharing 2 projects I made for my last post on the Craft-dee Bowz team.  I have enjoyed working with everyone and the new team is going to be beyond amazing.   My 1st project is a bow card I made using my CDB tool nothing makes ribbon creating any easier. 


Many Thanks to everyone at Craft-dee Bowz for an amazing year
Now on to my 2nd project which is actually a home decor piece
 I will be hanging this in kitchen
 I thought Memories was perfect for this post for the memories I have from CDB
 I added my bow underneath some of the flower it adds a perfect finish to the whole thing

I hope everyone had an amazing Christmas although mine was not the happiest, but I am hoping next year is better and for certain things that has happened to turn out for the best.  Always remember your loved ones and never lose touch you never know when things can change and remember everyday is a Gift! not just Christmas...

simply Monica

Tuesday, December 16, 2014

JOY

Hello everyone,
Barbara here back back today with what is my last Craft-Dee BowZ post here for 2014.We have a few more posts left to finish out the year and then we will have two new designers starting in January. Make sure to check out our blog for the last of this years posts.

I recently bought a stair step die from Accucut and decided to use that card design for this, my last Craft-Dee BowZ project for this year.

Let me share this card with you.


I used a typewritten designer paper to mat the front while I used an embossed white card stock to mat the back.

 
 On the steps I used a cut out of the word JOY using that same designer paper


Here is a close-up of my bow. I made a triple loop bow and positioned it up by the top step, allowing for the card to be closed and mailed.

SUPPLIES USED ON MY PROJECT
Stamps:  Sizzix Holiday Joy 
Paper/Card Stock
: Green CS, Wjite CS, DP
Ink: Memento - Olive Grove, Peanut Brittle, Rich Cocoa
Dies Used: Sizzix - Holiday Joy, Word Play Alphabet, Accucut - Stair Step Die
Accessories
Craft-Dee BowZ  tool,  ribbon, embossing folder, dimensional foam, Starform Stickers (used as border on the front panel over the DP)

Friday, December 12, 2014

Present Card with Guest Designer Dana Tatar


Hi Craft-Dee BowZ fans! Guest Designer Dana Tatar here today sharing a festive holiday card. I thought it would be fun to make a card that looked like a wrapped present and this is what I came up with.


I attached a fun piece of red polka dot patterned paper to a cardstock card base and then applied green polka dot fabric tape both vertically and horizontally across the center of the card. I added a large canvas flower to the center of the card and tucked gold Starform Stickers around the flower. I backed the gold holly leaves with green paper for a pop of color. I added a stamped gift tag under the edge of the flower. I topped the flower with a large glittery triple-loop bow that I tied with my Craft-Dee BowZ Tool. I finished the card with a patterned paper tag, small flower, twine bow and some acorns.

Thanks for stopping by today!

Supplies: Patterned Paper: My Mind's Eye, Nikki Sivils; Tag: Avery; Gold Stickers: Starform; Ink: Ranger; Stamps: Paper Wings Productions; Canvas Flower: Canvas Corp; Other: Ribbon, Twine, Small Green Flower, Fabric Tape, Cardstock

Tuesday, December 9, 2014

"Ornamental" Red and Gold Card

Vicki here with my December inspiration for you!

I'm a traditional kind of gal when it comes to the Christmas holidays.  I love the deep, rich reds and greens along with the ever present gold and silver that accompany them during the season.  Here at Craft-Dee BowZ, we are working with these colors during the month of December following a Christmas/holiday theme for our projects.

I created a card using red and white with gold accents.   The fabulous ribbon in our DT package this month was perfect to adorn the top of this Christmas ornament!

"Merry Christmas"

The card base is deep red cardstock matted with white pearl, embossed paper.  I used a folder that reminded me of falling snow as the background.  The ornament is a two part die-cut, the base and the over layer.   I added a gold jump ring at the top of the ornament along with a red/gold bow created with my amazing Craft-Dee BowZ tool.  Making bows is an easy task when using this tool. The sentiment sticker was another fun treat that came with our DT product.  It's matted with both white and gold paper cut with one of my favorite tag die-cuts.  I used pop dots on the back of the ornament and sentiment tag for added dimension.

Featured Product
Craft-Dee BowZ Bow Making Tool

Thanks for stopping by to share my holiday inspiration!

Be sure to play along with our December monthly challenge...
"Anything goes and include a bow".
You could be the winner of 25 yards of yummy ribbon.

Sunday, December 7, 2014

The Stair Step Bow

Hi Everyone,
Thanks for stopping back today. I posted this on my blog but thought I'd share this over here on the Craft-Dee BowZ blog as well. This post will show you how I achieved a triple loop look while only making a double loop bow. Maybe I should call this look the stairstep loop bow, because the loops look like they are in a stairstep position, one on top of the other.


Well you think you are seeing 3 loops but its a trick. Let me say this will only work with wired ribbon, because you are manipulating the ribbon and the wire holds the ribbon right where you have positioned it.

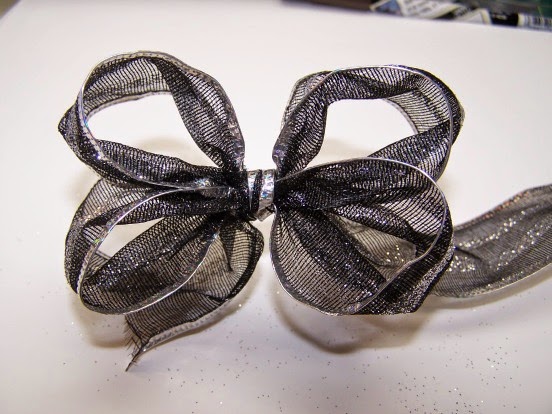
 I am using a black and silver wired edge ribbon and it's 1 1/2" wide

First, I started out making a double loop bow, like usual. And of course I am using my Craft-Dee BowZ tool.

This is the 1st wrap of ribbon around the pegs.

This is after the 2nd wrap of ribbon.

I have tied the ribbon ends and this forms the knot of the bow.

I've removed the ribbon from the tool  and I have pulled the loops out and now you can see there are 2 loops on either side of the knot.

 Fluff them out somewhat


Now I have positioned the loops one on top of the other. At this moment the loops are the same length and they are stacked.(A double loop bow has 2 loops on either side of the knot)

 Top view, - from the top it just appears to look like an ordinary single loop bow because the loops are actually stacked one on top of the other.

 Here is where the trickery begins.
The top loop is the loop that gets manipulated. See how I have started to dent it in to the center of the loop, down towards the knot, somewhat. Think of it as you are making a pleat. I started that dent about 1/3 of the way up from the knot. If you do the dent in the center of the loop then you will have these two loops being the same size and you won't achieve a stairstep effect.


Make the dent to both of the top loops.

 See how I have brought the ribbon from the top loop in more toward the knot. This defines the fake top loop even more.


 Here is a different view.


 Here is a view from the top after working with both top loops.


 Here is a side view. See how that top loop looks kind of swirly. The top loop is just bent in, in a pleat fashion, to give the illusion of another loop. 
That's all there is to this bow. Its a great bow especially if you don't have enough ribbon to make an actual triple loop bow. I like this effect because of the stairstep look.

 I hope the pics help you to see how I designed this bow. This bow does fool the eye, doesn't it.

Thanks for stopping back today. Now it's your turn to make a double loop bow with a stairstep effect.And wouldn't  that bow would look great on a gift.

Have a "bow"tiful day